The Editor
In the editor, you draw and change a diagram, and Builder saves each change and checks the diagram while you work. This page explains the parts of the editor, the checks, the command palette and the settings.
The five areas
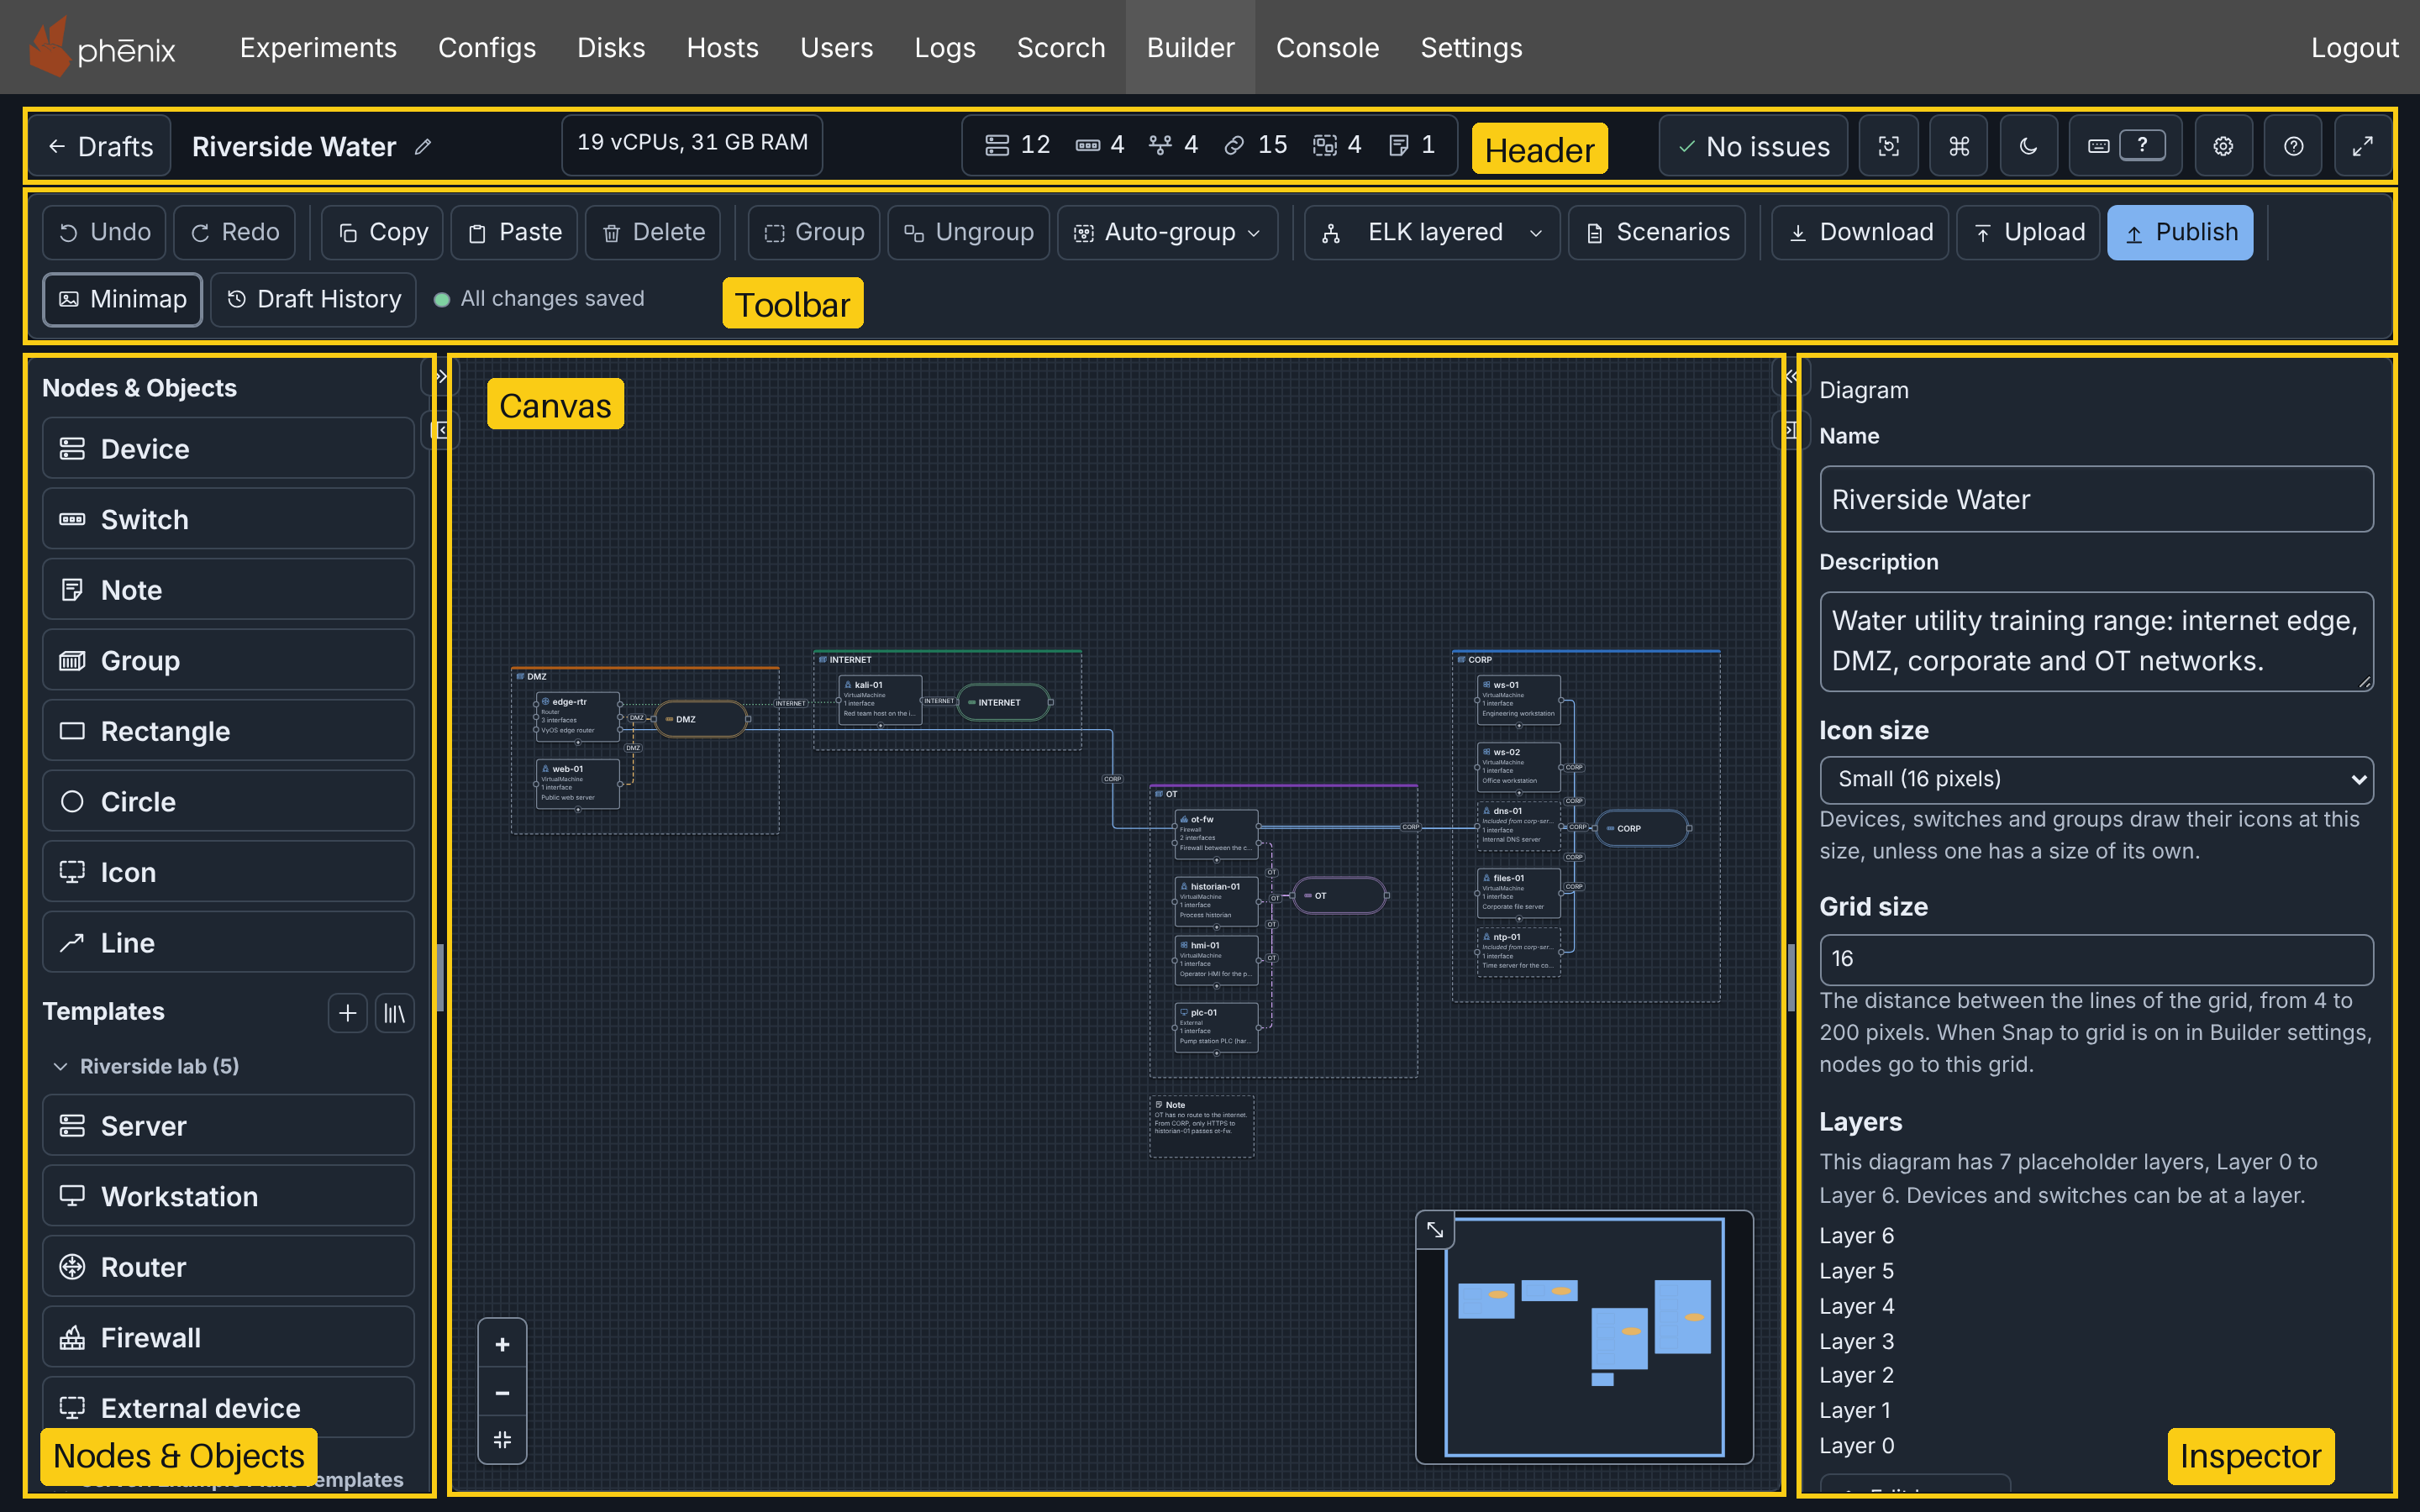
The editor has five areas: the header, the toolbar, Nodes & Objects at the left, the canvas, and the Inspector at the right.
Header

From left to right, the header holds:
- Drafts, which opens the drafts page.
- The diagram name, with Edit diagram name (the pencil), except in a published diagram.
- The resource totals of the devices that phēnix starts (see Resource totals).
- The counts of devices, switches, networks, connections, groups and notes. Click a count to select all items of that kind (see Selecting by kind).
- The checks button: No issues, or a count such as 3 warnings.
- The view buttons: Reset view, Commands, the theme button, Shortcuts, Settings, Help and Focus mode.
To rename the diagram:
- Click Edit diagram name. A field replaces the name.
- Enter the new name.
- Press Enter.
The topology name is different: you enter it when you publish (see Publishing).
Toolbar

- Undo, Redo: undo or redo the last change.
- Copy, Paste, Delete: copy, paste or delete the selection.
- Group, Ungroup, Auto-group: put the selected nodes in a new group, delete a selected group and keep its nodes, or group by network or by name.
- The layout menu: arrange the diagram.
- Scenarios: select, view, edit or create the scenarios.
- Download, Upload: save the diagram as a file, or open a diagram file as a new draft.
- Publish, Exp: write the configs, or open the experiment that you published. Exp shows only while that experiment exists and your role can read it.
- Minimap, Draft History: show or hide the minimap, or restore a snapshot of the draft.
The save state follows, for example All changes saved. When a save fails, Retry saving follows it (see Drafts). A button whose action can take time shows a turning ring (see Actions that take time).
Canvas
- To select: click a node or a connection. Shift+click adds a node to the selection, or deselects it. Click an empty spot to clear the selection.
- To move: drag a node.
- To pan: drag an empty spot.
- To zoom: use the mouse wheel, or the zoom buttons at the bottom left.
- To connect: drag from the connection point of a device to a switch (see Diagrams).
The minimap at the bottom right shows the full diagram. Reset view in the header resets the zoom, the minimap and the side columns, and does not change the diagram (see Canvas).
Rest the pointer on a device or a switch to see its info tooltip (see Info tooltips).
Side columns
You can widen, hide or resize the left column and the Inspector at the right (see Side columns). The buttons for the left column use the name Nodes & Templates.
Nodes & Objects lists Device, Switch, Note, Group and the drawings. Click an item to add it, or drag it onto the canvas. Templates lists the device templates (see Templates and Icons).
Inspector
The Inspector shows and changes the fields of one selected node or connection. With nothing selected, or with several items selected, it shows the diagram:
- Name and Description. Click Apply to keep a change.
- Layers: Edit layers… opens the layers editor.
- Notes: text about the full diagram.
- Scenarios: Edit scenarios opens the Scenarios dialog (see Diagrams).
For the other fields, see With nothing selected.
Editing a node
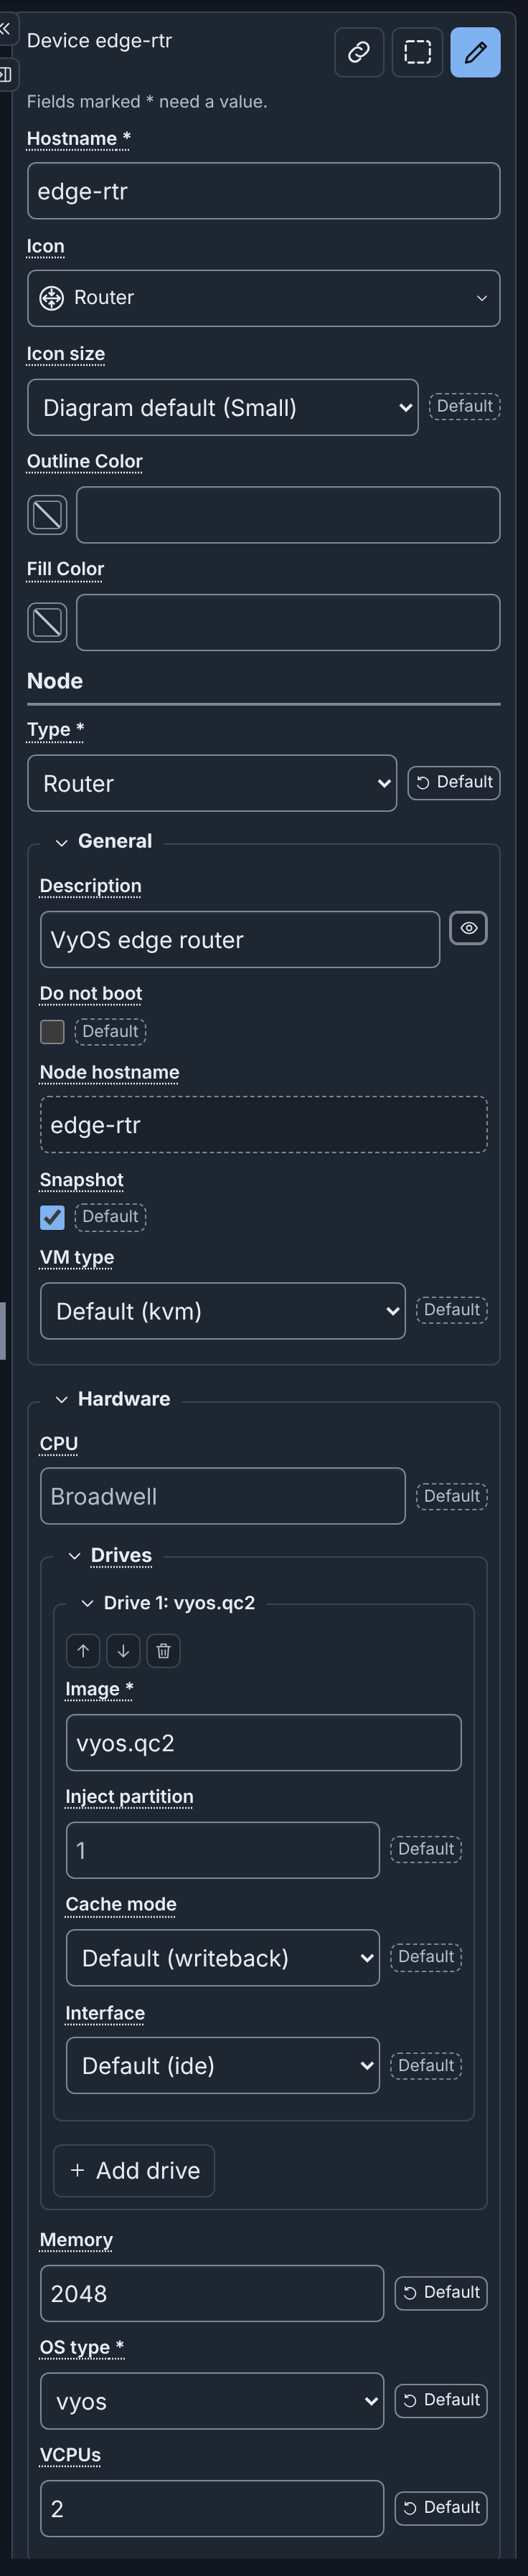
Select a node to see its fields. A device has Hostname, Icon and the colors at the top, then the sections Node, Hardware, Network, More settings, Layer, Connection points and Position.
A field marked * must have a value. A field with a value other than its default shows a Default button.
To change fields:
- Change one or more fields. A bar at the bottom says "Unapplied changes", with Apply and Cancel.
- Click Apply, or press Enter in a field. Builder changes the diagram and saves it.
Cancel discards the changes. While a changed field has an error, Apply is unavailable. When you select another node, the Inspector applies valid changes and discards changes that are not valid. Icon, the colors and Layer take effect at once, without Apply (see Fields that take effect at once).
Icon opens the list of built-in icons. Default is the icon of the node when it has no icon of its own. Custom icon… opens the Custom icons dialog (see Templates and Icons).
You cannot change a device from an included topology, but you can move it. You cannot rename a network that an included device is on. In a published diagram, you cannot change any field (see Fields you cannot change).
With one node selected, the Inspector header has Add connection, Move to group and Open Node Editor (see The Inspector header). Click the name of a section to collapse or expand it (see Collapsing sections). The eye button beside Description hides it on the canvas (see Hiding descriptions on the canvas).
A switch, a note, a group, a connection and a drawing have their own fields (see Other kinds of nodes). A switch also has Subnet, Gateway and Assign addresses (see Addresses of a network).
Node Editor
The Node Editor shows the fields of one node in a large dialog, with the checks of the node. To open it, double-click the node, or click Open Node Editor in the Inspector header.
Search fields finds a field by its label, such as memory, or by its
YAML path in the Topology config, such as network.interfaces[0].vlan. Only
the matching fields show. To show all fields again, empty the box.
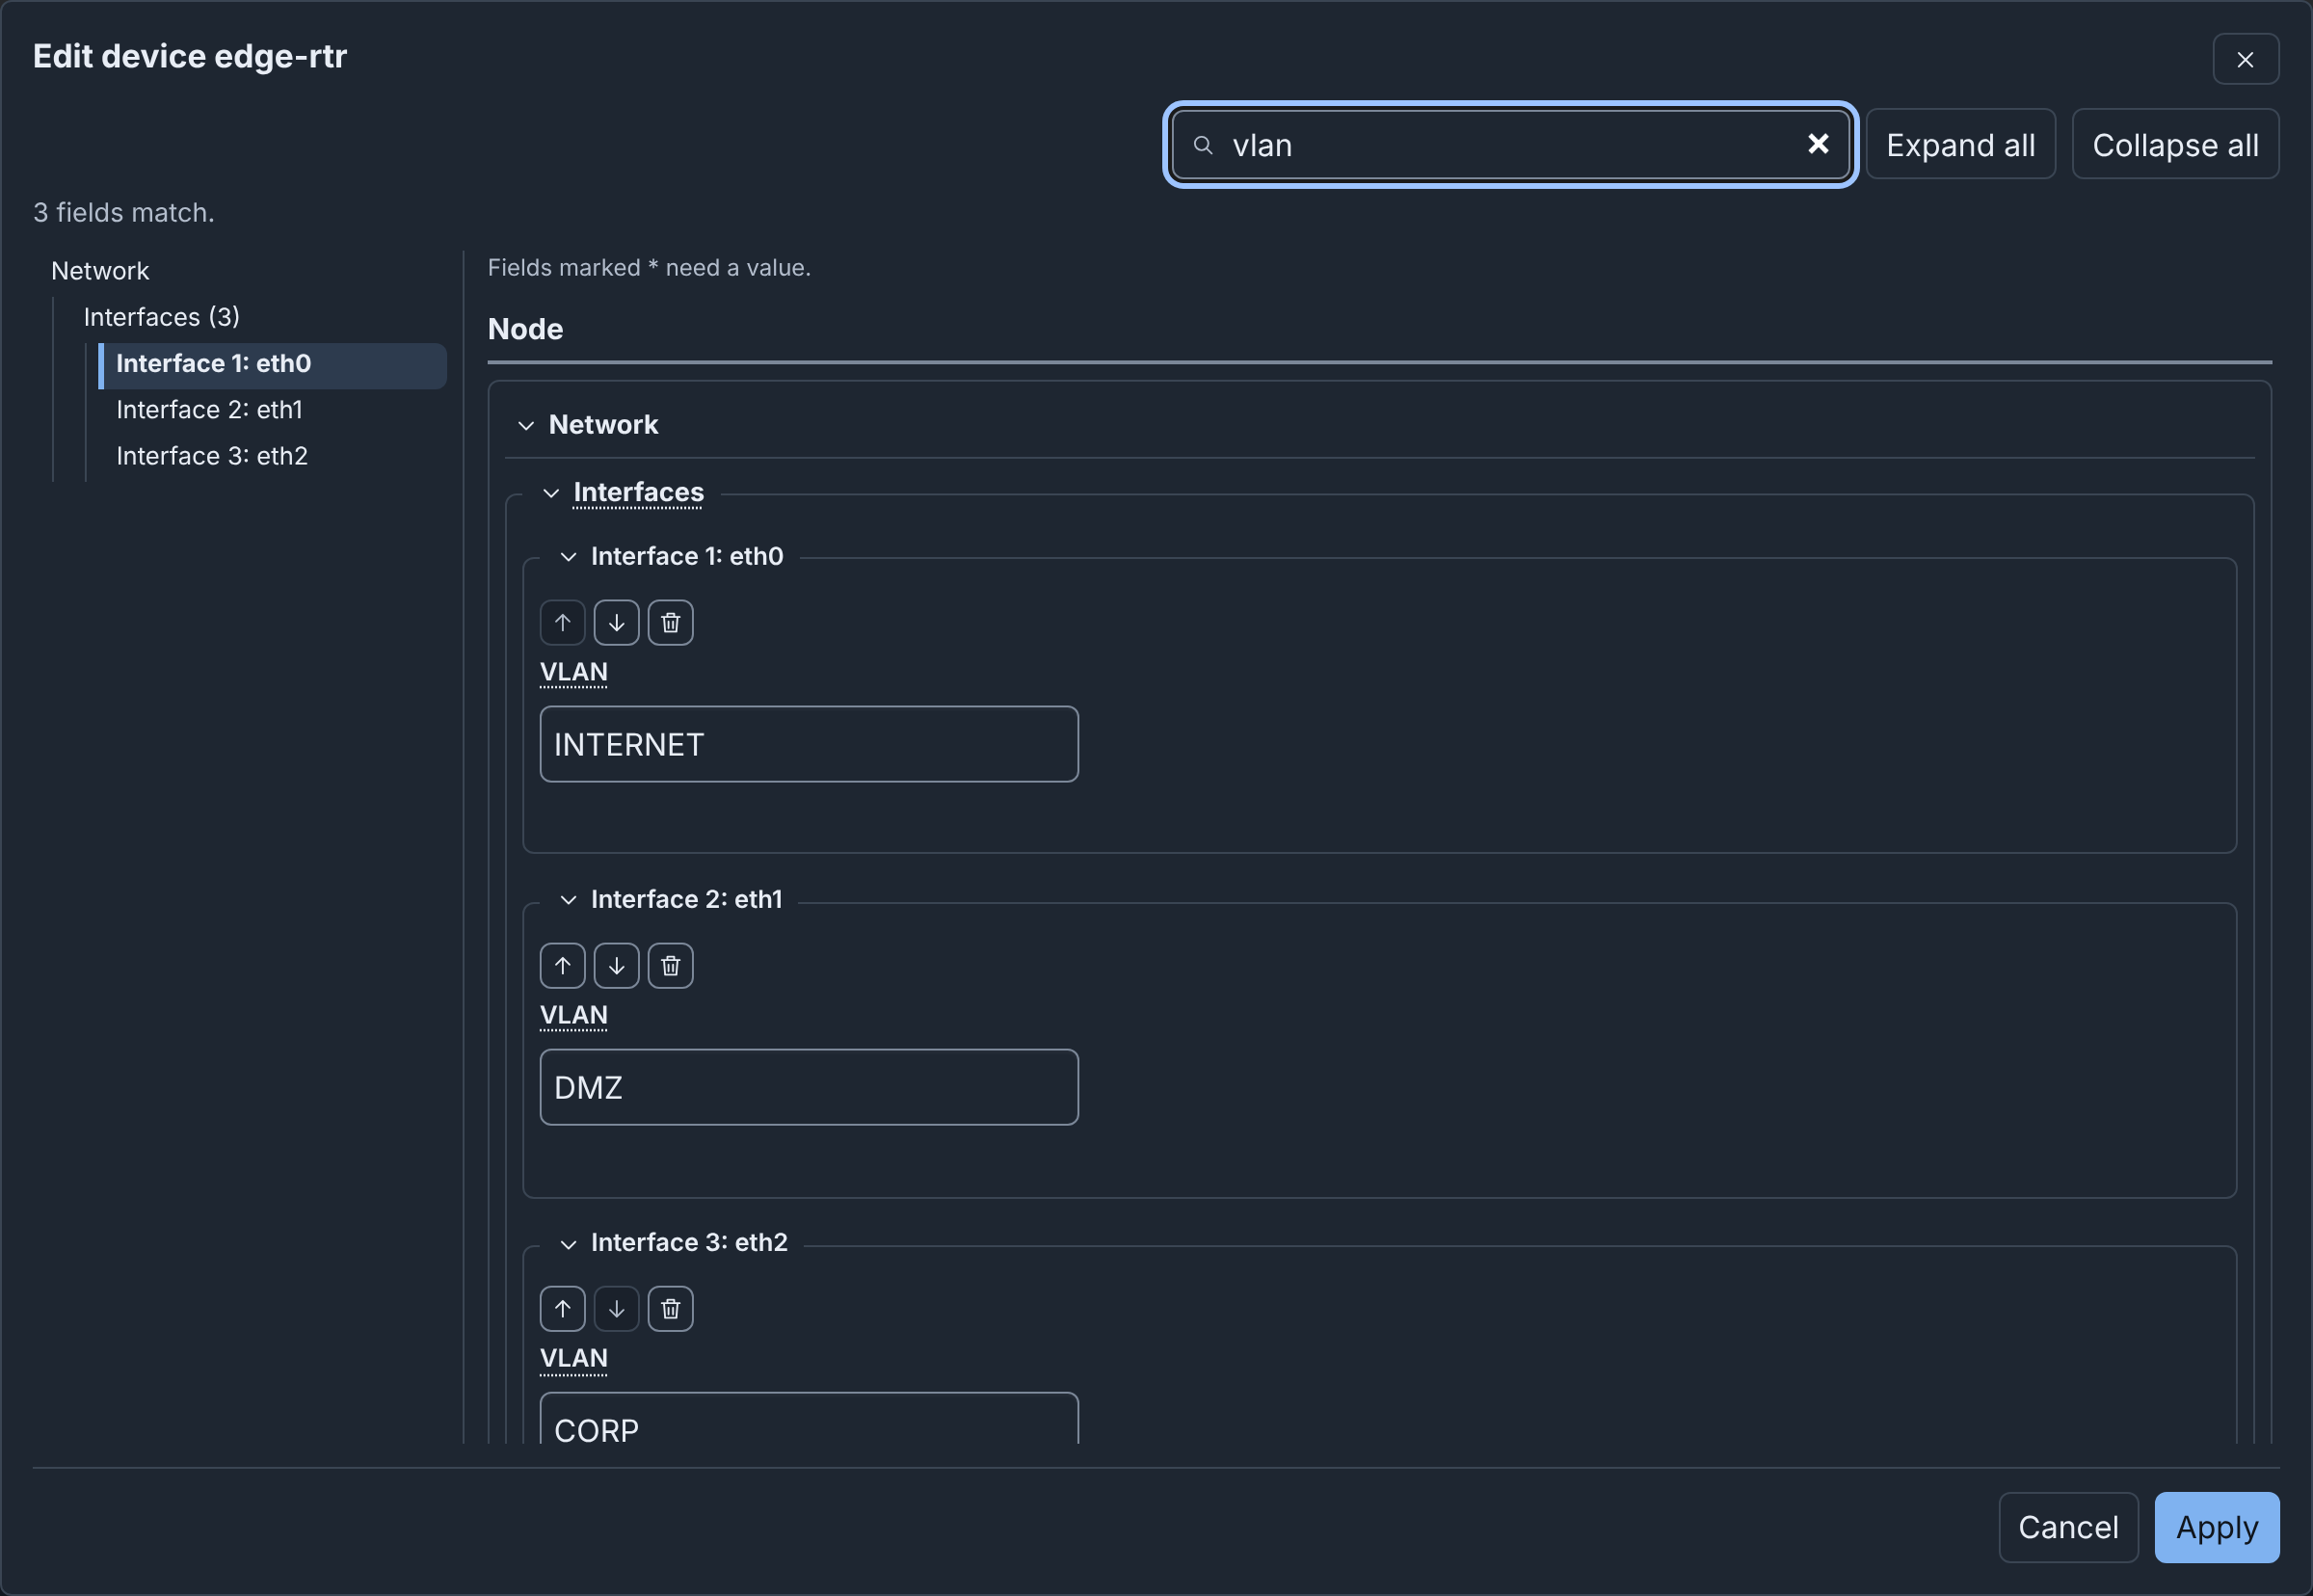
Click Apply to apply all changes as one step of Undo and close the Node Editor. Cancel closes it. Builder asks before it discards unapplied changes. See also Sections and the table of contents and Searching the fields.
Checks and warnings
Builder checks the diagram while you edit it. The canvas marks each node and connection with an issue: a cross for an error, or a triangle for only warnings.
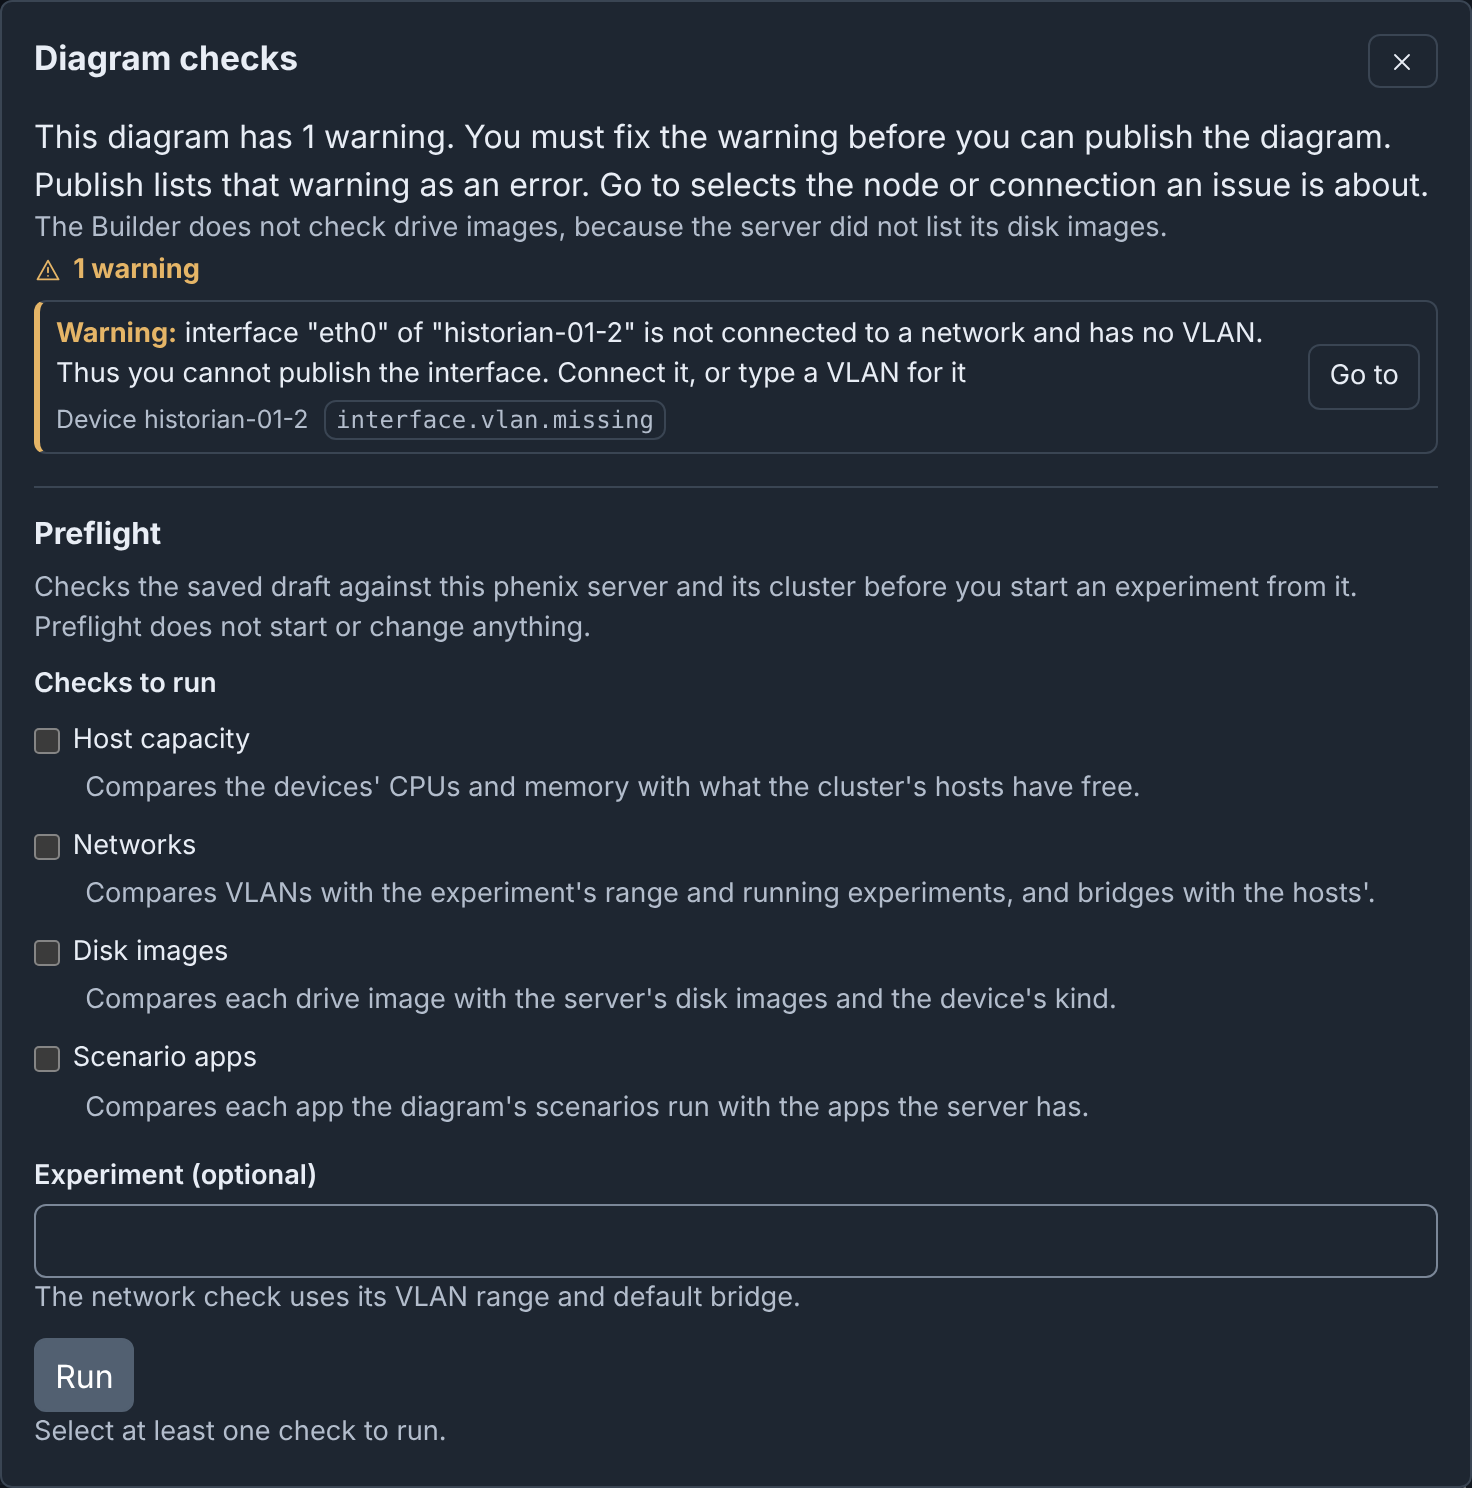
To fix an issue:
- Click the checks button. The Diagram checks dialog lists the errors, then the warnings.
- Click Go to beside the issue. The canvas selects its node, and the Inspector shows it.
- Fix the field.
An error stops publishing until you fix it. Some warnings also block Publish, and the dialog says so (see Publishing). Other warnings do not block publishing.
Some issues have a Fix button. Undo reverts each fix as one step (see Fixing an issue in one step).
Builder also warns about settings that phēnix accepts but does not apply as the diagram shows them (see Rulesets and addresses and Device settings).
Preflight
Preflight, at the bottom of Diagram checks, asks the phēnix server to check the saved draft against the server and its cluster. The checks write nothing and start no VM or experiment. There are four: Host capacity, Networks, Disk images and Scenario apps.
To run Preflight:
- Click the checks button in the header.
- Under Preflight, tick the checks.
- Optional: in Experiment (optional), enter the name of the experiment.
- Click Run. Builder first saves your latest changes.
Each check shows Passed, Failed or Unavailable. Unavailable means that Builder could not do all of the check, for example without a permission or a connection to minimega (see Preflight).
Command palette
The command palette runs commands and finds nodes, networks, templates and icons. To open it, click Commands in the header, or press Ctrl+K (⌘+K on macOS).
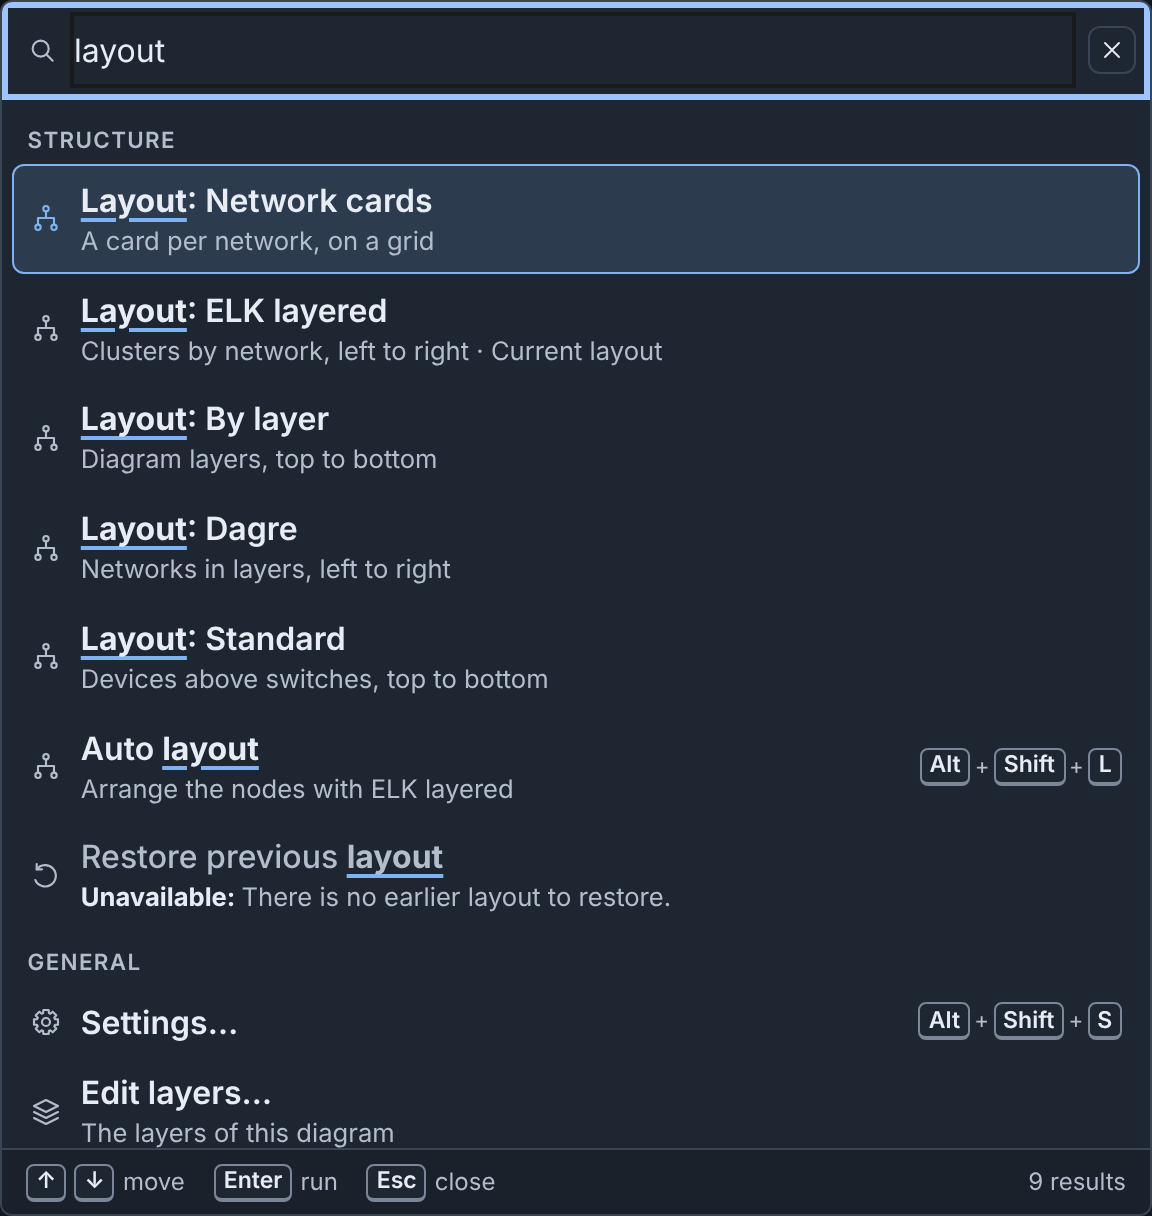
- Type words to find commands, for example
layout. - Type
@to find a node by its hostname, address, VLAN, label or description (see Finding nodes). - Type
#to find a network by its name or VLAN alias. - Type
t:for node templates,c:for template collections andi:for custom icons (see Finding templates, collections and icons). - Type
?to see all prefixes.
Keyboard shortcuts
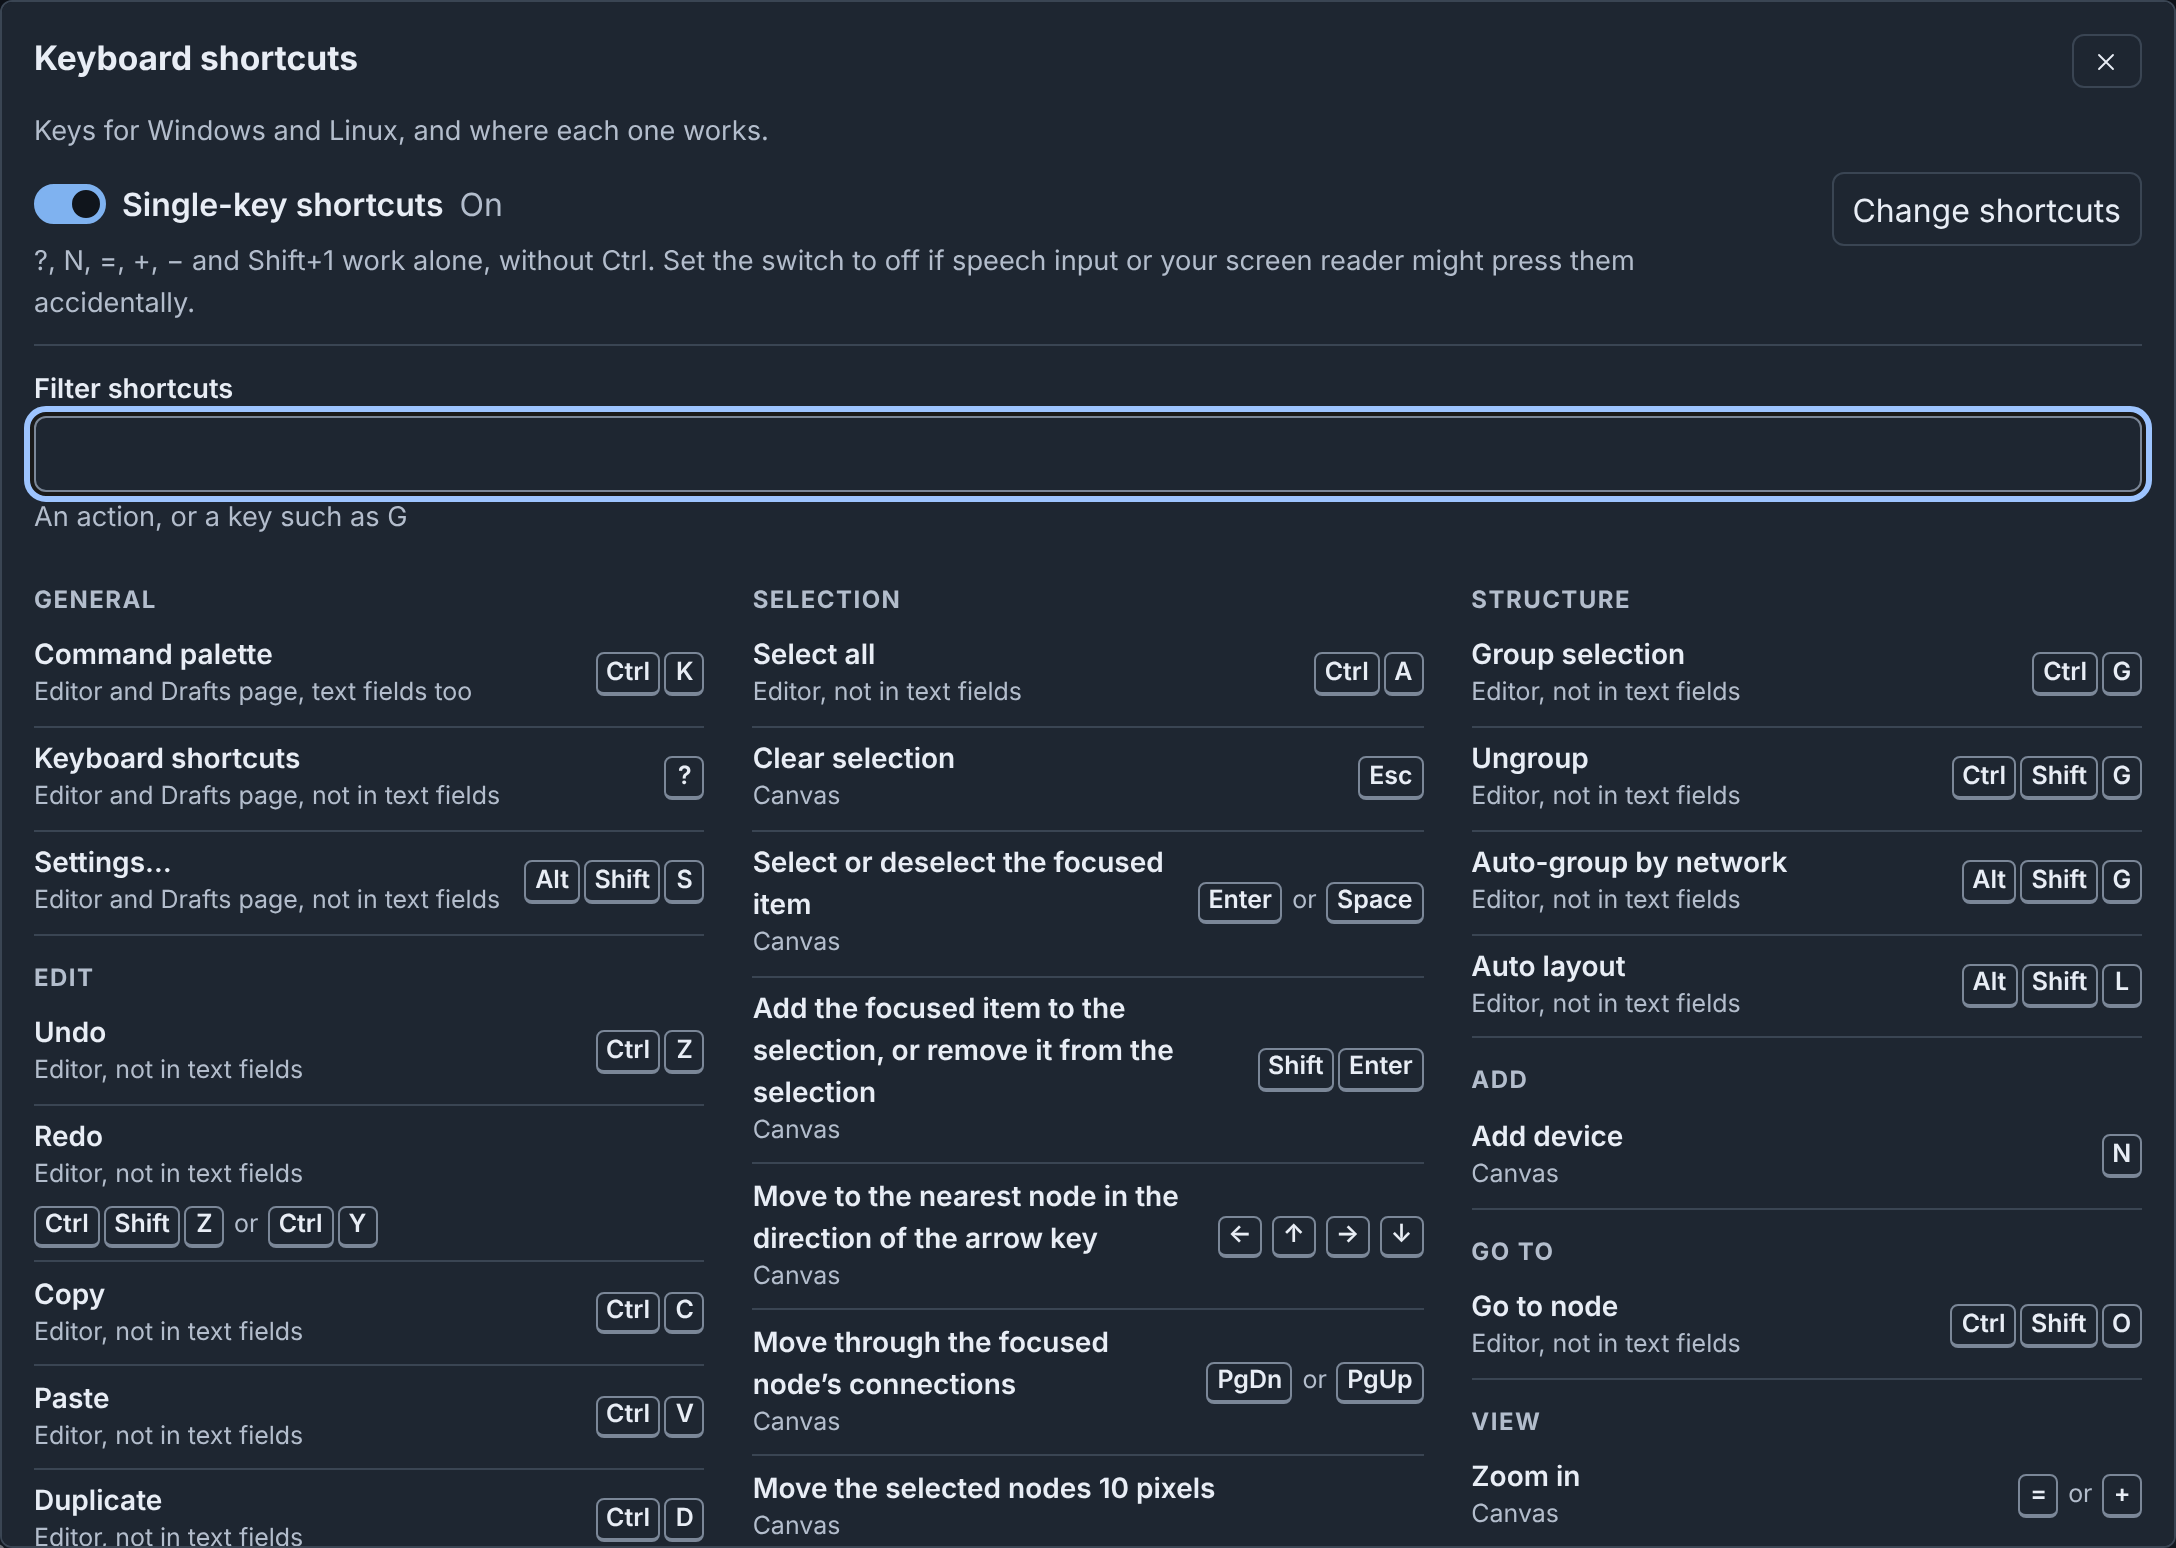
To see all shortcuts, click Shortcuts in the header, or press ? outside a text field. The keys that you use most are Ctrl+Z (⌘+Z on macOS) for Undo and Ctrl+D (⌘+D on macOS) for Duplicate. Delete deletes the selection, and N adds a device.
Most keys do nothing while focus is in a text field. The full table, with the macOS keys, is in the Reference. For the canvas keys, see Keys on the canvas.
Settings
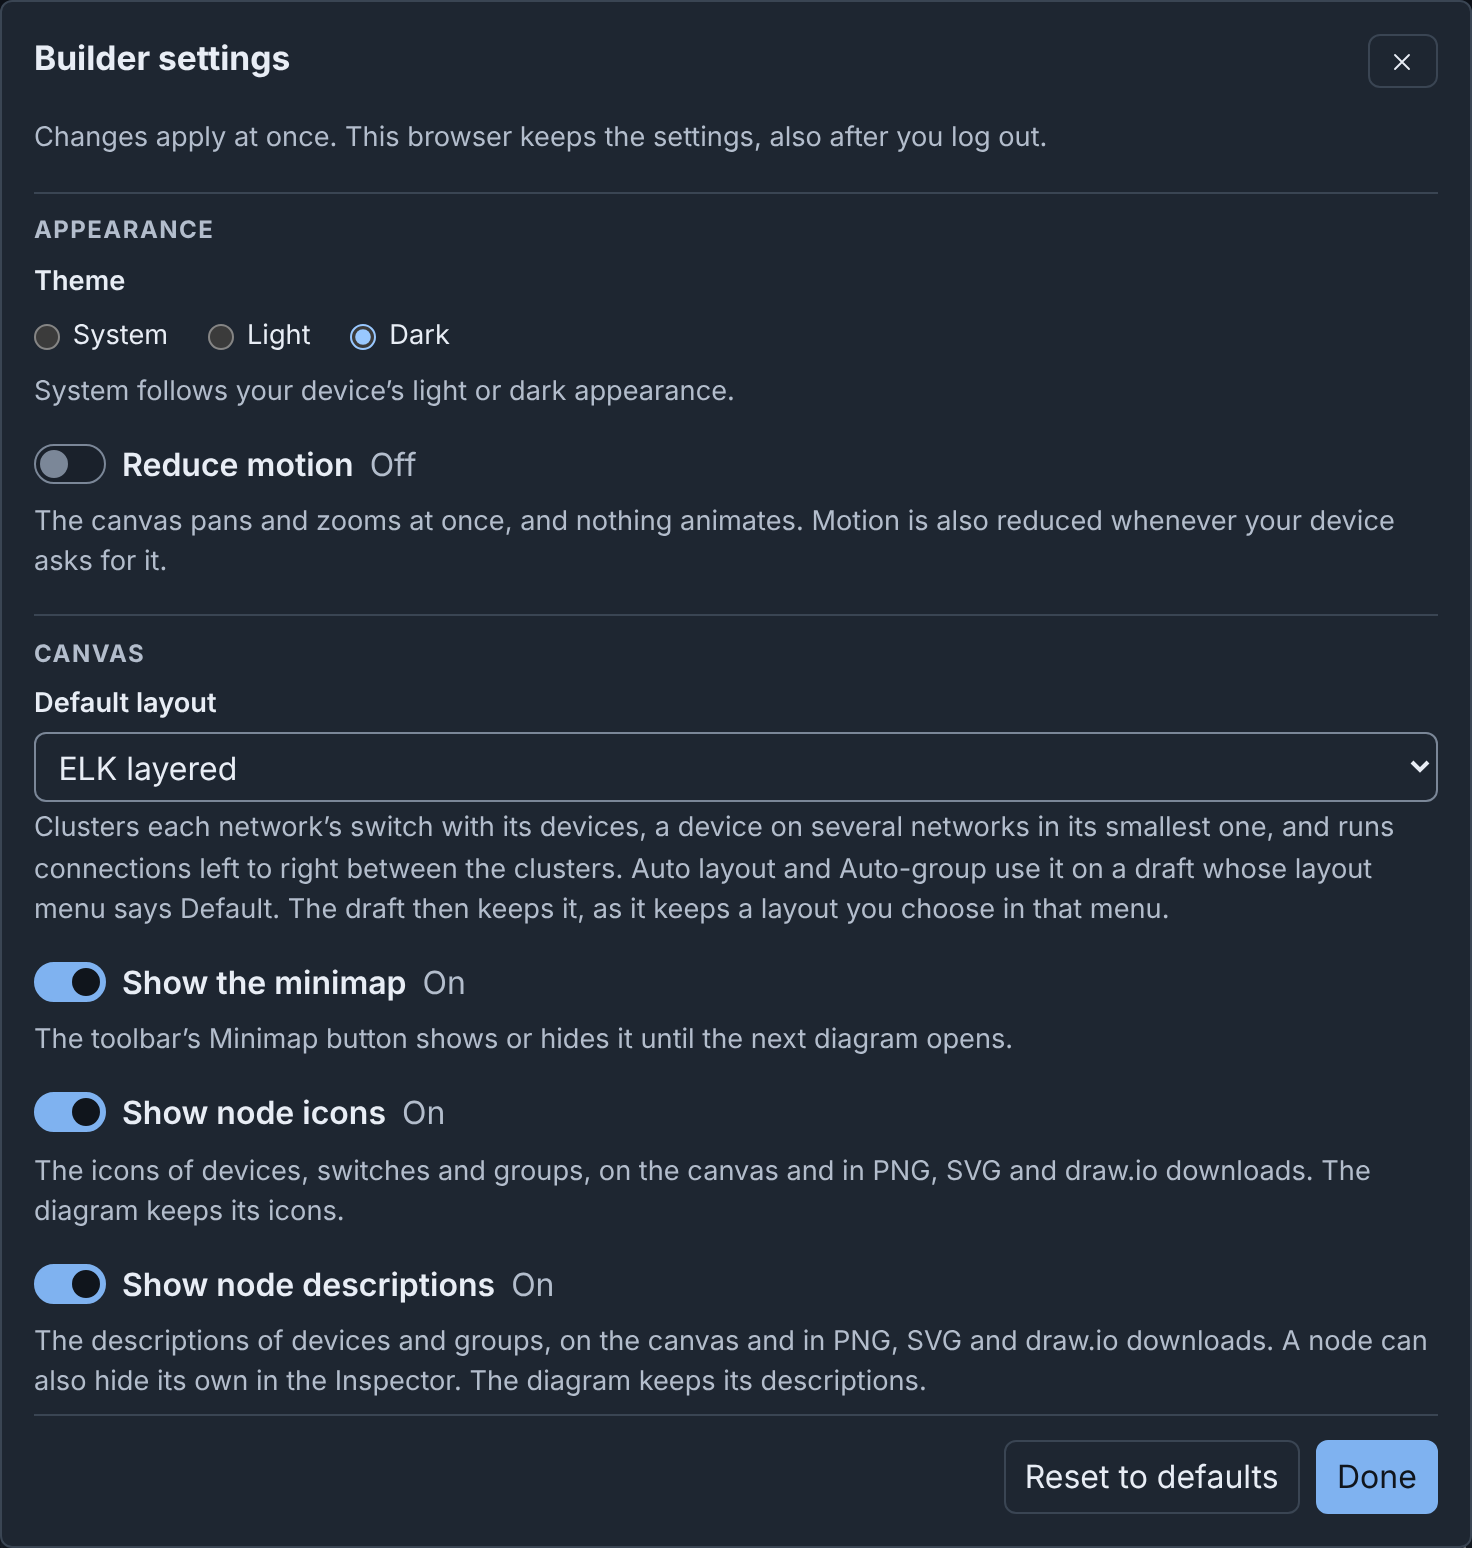
To open Builder settings, click Settings in the header, or press Alt+Shift+S (⌥+⇧+S on macOS). Changes apply at once. The settings belong to this browser: it keeps them after you log out, and they do not change the diagram. For each setting and its default, see Settings.
Advanced
- Single-key shortcuts: ?, N and the zoom keys work without Ctrl. If speech input or your screen reader can press them by mistake, disable the setting. See Single-key shortcuts.
- Change shortcuts, in the shortcuts sheet, gives any command other keys, or no keys. See Customizing shortcuts.
- Clean up…, under Storage in Builder settings, deletes the published, unchanged drafts of all users and the stored data that nothing uses. It asks before it deletes. See Administration.
- The layers editor changes the layers of the open diagram. Edit layers… opens it from the Inspector, the Node Editor, Builder settings or the command palette. See Diagrams and Layers editor.
- Focus mode hides the phēnix navigation bar, so Builder fills the window. Click Focus mode in the header, or press Ctrl+Shift+F (⇧+⌘+F on macOS). See Focus mode.
- The theme button in the header shows System, Light or Dark, and each click selects the next theme. The theme changes only Builder, not the rest of phēnix. See Themes.
- Accessibility: you can use Builder with only a keyboard, and with a screen reader. Builder aims to meet WCAG 2.2 level AA. See Accessibility.
More detail
- The Editor: details: every rule, limit and message.
- Checks and Preflight: details: every check, fix and preflight result.
- Command Palette and Shortcuts: details: every command, search prefix and key.
- Codes: the code of each issue.
- What blocks publishing: the warnings that Publish lists as errors.