VMs
VM Info
From the Web-UI
The experiment must be started; click on the experiment name to enter the Running Experiment component. Within that component, click on the VM name and you will be presented with a VM information modal.
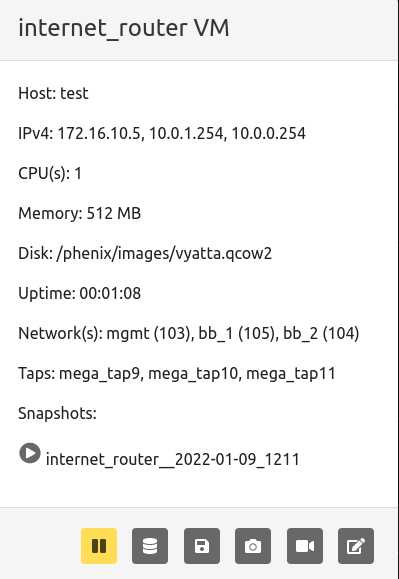
Available commands
restorea snapshot by clicking the play button next to the desired snapshot name.
Buttons from left to right:
pausea running VM- Create a
memory snapshotof a running VM - Create a
backing imageof a running VM - Create a
snapshotof a running VM record screenshotof a running VMmodify stateopens another toolbar of buttons
Modify State Toolbar

Buttons from left to right:
redeploya running VMreset disk stateof a running VMrestarta running VMshutdowna running VMkilla running VMclosemodify state toolbar
From the Command Line Binary
There are two options for displaying the information for VMs in an experiment. First run the following command to see information for all VMs in a given experiment.
Or, run the following to see the information for a specific VM in an experiment.
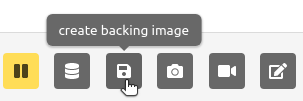
Create a Backing Image
From the Web-UI
Click on the name of a running VM in a started experiment to access the VM information
modal. Click the create backing image button as shown in the screenshot below.
From the Command Line Binary
Not applicable.
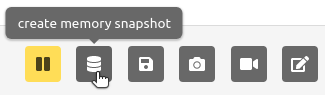
Create a Memory Snapshot
From the Web-UI
Click on the name of a running VM in a started experiment to access the VM information
modal. Click the memory snapshot button as shown in the screenshot below.
From the Command Line Binary
To create an ELF memory dump, run the following command.
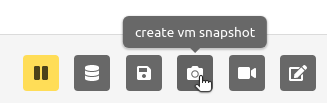
Create a VM Snapshot
From the Web-UI
Click on a running VM in a started experiment to access the VM information
modal. Click the vm snapshot button as shown in the screenshot below.
From the Command Line Binary
Not applicable.
VM VNC Access
From the Web-UI
The experiment must be started; click on the VM screenshot to open a new browser tab that provides VNC access to the VM.
From the Command Line Binary
Not applicable.
Mount a VM
The VM Mount feature lets you transfer files to and from a running VM directly
through the phēnix Web-UI. It is an optional feature that must be enabled when
starting the phēnix UI with the vm-mount feature flag (see
Enabling VM Mount below).
Note
Mounting a VM requires the minimega command-and-control agent (miniccc)
to be installed and actively running in the VM. If cc is not active for a
VM, the mount button is disabled.
Enabling VM Mount
VM Mount is disabled by default. Enable it by passing the vm-mount feature to
the --features flag when starting the UI:
The feature can also be enabled via the ui.features configuration key or the
PHENIX_UI_FEATURES environment variable. See
Settings & Configuration for details.
From the Web-UI
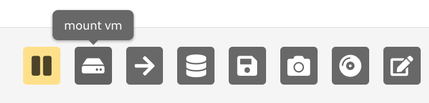
The experiment must be started. Click on the name of a running VM to access the
VM information modal, then click the mount vm button (the hard-drive icon).
The mount browser modal presents two panes:
- Local file system — browse to a file on your local machine and upload it into the VM, or download a file from the VM to your local machine.
- Experiment files — copy files that already exist on the phēnix server into the VM. This option is only available when the experiment file server is enabled (see below).
Uploading Experiment Files from the phēnix Server
phēnix can optionally run a lightweight file server on a port separate from the main UI. This was added to support environments where the phēnix UI is only reachable on a private network but files (for example, application installers or configuration files) need to be uploaded to an experiment from a public network.
When the file server is enabled, the VM Mount modal gains the Experiment files option described above, allowing files that have been uploaded to an experiment to be copied directly into a VM without going through the user's local machine.
Enable the file server by passing the --file-server-endpoint flag when
starting the UI:
# Bind to 127.0.0.1 on port 8080 (port-only value binds to localhost)
phenix ui --features vm-mount --file-server-endpoint 8080

# Bind to a specific interface and port
phenix ui --features vm-mount --file-server-endpoint 0.0.0.0:8080
The file server presents a simple interface for selecting an experiment and uploading a file to it. When authentication/authorization is enabled for the main phēnix UI, it is automatically enforced on the file server as well, so users must already have valid phēnix credentials to upload files. File upload permissions are included in the default Experiment Admin and Experiment User roles.
See Settings & Configuration for the
ui.file-server-endpoint configuration key.
From the Command Line Binary
Not applicable.
Packet Capture
From the Web-UI
Click on the name of the network tap on a running VM in a started experiment to start a packet capture. The name of the network tap will turn green once a packet capture has started. It is possible to start captures on multiple network taps. However, when you stop packet capture, it will stop captures on all network taps.
From the Command Line Binary
To start a packet capture, run the following command.
To stop all packet captures on a running VM, use the following command.
Kill a VM
From the Web-UI
Click on the name of a running VM in a started experiment to access the VM information
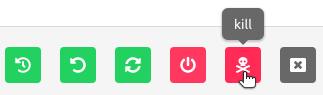
modal. Click the modify state button on the far right to open the modify state toolbar.
Click the kill button as shown in the screenshot below.
Note: if you stop and then start the experiment again, that VM will run again per the experiment configuration.
From the Command Line Binary
To kill a VM, run the following command.
Modify the Network Connectivity
From the Web-UI
Click on the network for the desired VM in the Running Component to modify the settings. Select from a pull down what network you want to switch the VM interface you clicked on to. To revert back to previous setting, simply repeat selecting the network interface you wish to change, and select the previous network setting.
From the Command Line Binary
To connect a VM network interface to a different network, run the following command.
To disconnect a VM network interface, run the following command.
Pause a VM
From the Web-UI
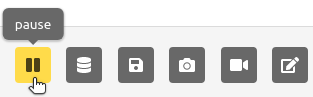
Click on the name of a running VM in a started experiment to access the VM information
modal. To pause a VM, click on the pause button as shown in the screenshot below.
To start a paused VM, that same button will become a green play button; simply
click it to start.
From the Command Line Binary
To pause a VM, run the following command.
To resume a paused VM, run the following command.
Redeploy a VM
From the Web-UI
Click on the name of a running VM in a started experiment to access the VM information
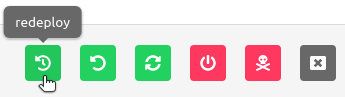
modal. Click the modify state button on the far right to open the modify state toolbar.
Click the redeploy button as shown in the screenshot below.
From the Command Line Binary
To redploy a VM, run the following command.
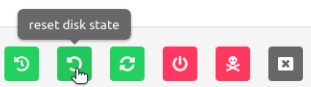
Reset Disk State
From the Web-UI
Click on the name of a running VM in a started experiment to access the VM information
modal. Click the modify state button on the far right to open the modify state toolbar.
Click the reset disk state button as shown in the screenshot below.
From the Command Line Binary
To reset the first disk to the initial pre-boot state, run the following command.
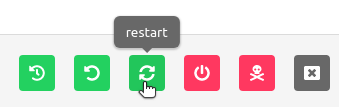
Restart a VM
From the Web-UI
Click on the name of a running VM in a started experiment to access the VM information
modal. Click the modify state button on the far right to open the modify state toolbar.
Click the restart button as shown in the screenshot below.
From the Command Line Binary
To restart a VM, run the following command.
Resume a VM
From the Web-UI
Click on the name of the paused VM in a started experiment to access the VM information modal. Click the green play button (previously the pause button, furthest button to the left).
From the Command Line Binary
To resume a paused VM, run the following command.
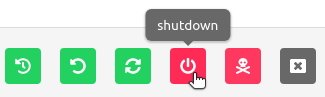
Shutdown a VM
From the Web-UI
Click on the name of a running VM in a started experiment to access the VM information
modal. Click the modify state button on the far right to open the modify state toolbar.
Click the shutdown button as shown in the screenshot below.
From the Command Line Binary
To shutdown a VM, run the following command.
Modify VM Settings
From the Web-UI
There are two ways to modify VM settings:
- Click on a stopped experiment to access the Stopped Component. You are able to edit the
following:
- Host name
- CPUs
- Memory
- Disk
- Do not boot flag
- From a running experiment, click on the VM name and then the redeploy button (yellow
power button, second from the right on the modal footer). You are able to edit the following:
- CPU
- Memory
- Disk
- Replication of original injections
From the Command Line Binary
To modify VM settings, run the following command, specifying one or more of the configuration flags described below.
Only the flags that are explicitly provided will be applied; any setting whose flag is omitted is left unchanged. The following flags are supported:
| Flag | Description |
|---|---|
-c, --cpu |
Number of VM CPUs (1-8 is valid). |
-m, --mem |
Amount of memory in megabytes (512, 1024, 2048, 3072, 4096, 8192, 12288, 16384 are valid). |
-d, --disk |
VM backing disk image. |
-p, --partition |
Partition of disk to inject files into. |
--do-not-boot |
Set the do-not-boot flag for the VM. |
--snapshot |
Set the snapshot (non-persistent) flag for the VM. |
-L, --label-changes key=value |
VM label to set, in key=value form. May be repeated to set multiple labels. |
--append-label |
Append the provided labels to the VM's existing labels instead of replacing them. |
-l, --label |
Apply the change to every VM whose label matches the provided label (supports glob patterns). Use all to select every VM in the experiment. May be repeated. |
For example, to set the CPU count to 4 and memory to 2048 MB for a VM named
my-vm in an experiment named my-exp:
To set the role=server labels on VMs whose existing labels matches
tier=web* in the same experiment, without clearing the existing labels:
To set two labels on the VM my-vm and replace the existing labels on the VM:
Note
Only label updates and interface VLAN connections can be modified while an
experiment is running. To change CPU, memory, disk, partition, do-not-boot,
or snapshot settings, the experiment must be stopped. Use
phenix vm net to modify interface
VLAN connections on a running experiment.
Applying Actions to Multiple VMs
Note
See VM Multi Action for documentation on applying actions to multiple VMs at once.